This post may contain affiliate links. Please read our disclosure policy.
The Best Peruvian Chicken Recipe (Pollo a la Brasa). This recipe requires no special equipment. All you do is prepare the marinade and allow the chicken to soak up all that flavor. Then toss it in the oven or on the grill. Serve Pollo a la Brasa with homemade green sauce.

Pollo a la Brasa.
One of my all-time favorite dishes to order at a Peruvian restaurant.
I can’t tell you how many times I’ve tested and retested this recipe to make sure I got it perfectly right. I wanted the taste to be absolutely perfect by the time I was ready to hit publish.
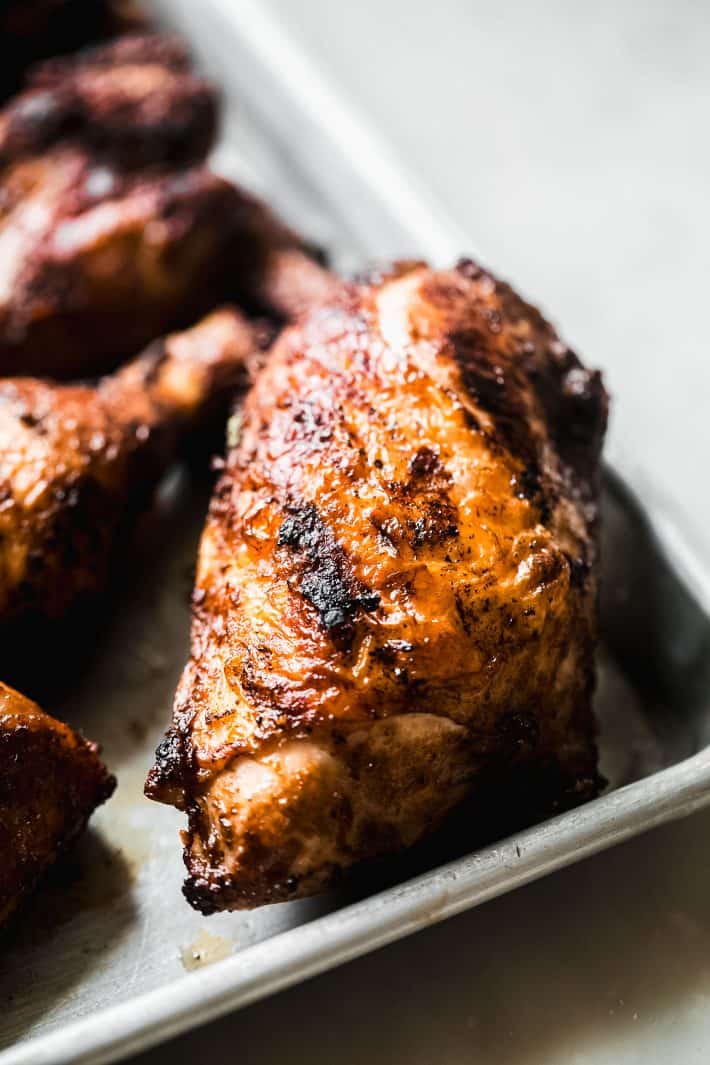
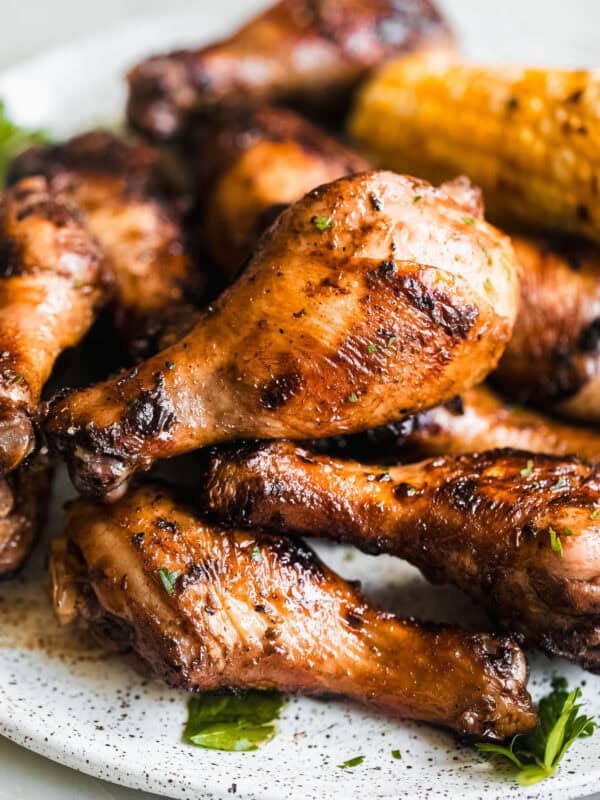
And I’m so happy to tell you it’s there. The chicken is succulent and tender right off the grill. The flavor on the skin is tender and delicate but salty and it pops on your tongue. The color is perfect from the soy-marinated chicken. The acid in the recipe helps tenderize the chicken to the bone, so it’s just falling apart in the best way possible.
And what really seals the deal for me?
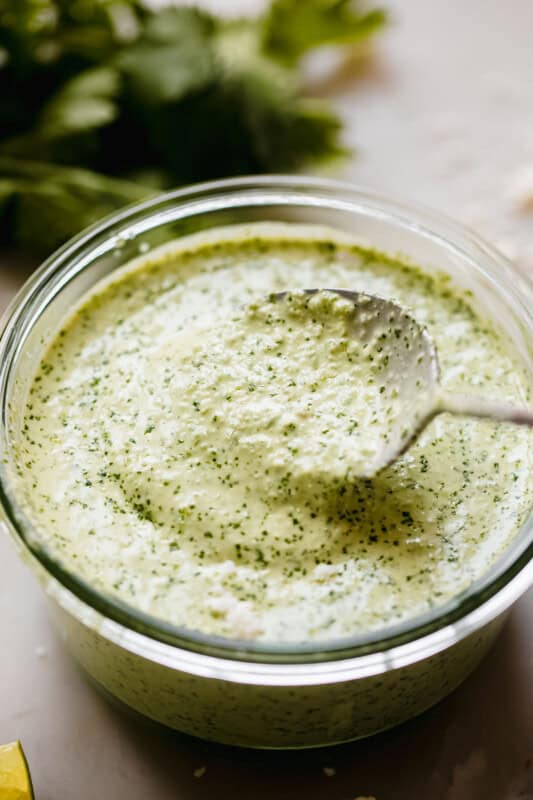
This recipe is ridiculously easy to make. Like, so easy that I suggest adding it to all your summer grilling plans. Toss a few ingredients in a zip-top bag and give it a squish. Then pop it on the grill. Finally, drizzle with aji verde to get the best most authentic experience.
I’m telling you, hit the print button on the recipe card, you’re going to love this.

Ingredients for Pollo a la Brasa
- Whole Chicken: You want to use a 3-4 pound whole chicken, basically the same size I suggest for my roasted chicken recipe. Any larger and you run the risk of it being gamey. A young chicken works best. Feel free to replace this with bone-in, skin-on chicken breasts or chicken thighs. I suggest not using boneless chicken for this recipe as the longer marination that’s required to give this recipe ample flavor just isn’t possible without the bones.
- Garlic Clove: You’ll need a handful of these! I like to mince it or run it through the garlic press to ensure that the flavor travels well throughout the marinade.
- Soy Sauce: If you’re skeptical about whether soy sauce belongs in a Peruvian recipe, let me explain! During the 19th and 20th centuries, there was an influx of Chinese immigrants migrating to Peru for work. They brought ingredients like scallions, soy sauce, and ginger with them. These ingredients found their way into traditional Peruvian dishes. The soy sauce adds color and umami to this dish. I like to use low-sodium soy sauce for this recipe so that it doesn’t become too salty as the chicken marinates in the fridge. You can sub gluten-free tamari if eating gluten-free is important to you.
- Seasonings: You’ll need kosher salt, ground cumin, hot paprika, dried oregano and black pepper. The salt is sodium in the dish. Cumin gives it an earthiness. The dried oregano adds a lightly floral aroma to the dish. The hot paprika adds color and a small amount of heat to the marinade.
- Lime Juice: Adds a fresh citrusy scent to the chicken. It also helps tenderize the poultry.
- Red wine vinegar: white vinegar or even apple cider vinegar make decent substitutes in this recipe. The acid helps break down the muscle fibers and allows the chicken to become super tender. We’re only using a tablespoon of this ingredient. Don’t worry, it won’t break down the chicken too much with the longer marination time.
- Avocado Oil: You could also use extra virgin olive oil or any other oil that you typically like to cook with. The reason we add this to the recipe is to help distribute the herbs and spices throughout the marinade.
- Prepared Aji Verde Sauce: So you can serve this with the chicken. It’s made in a blender or a food processor and loaded with garlic cloves, tender stems with fresh cilantro leaves, jalapeños, queso fresco, mayonnaise, lime juice, and more. You can find the full recipe here.

Making Peruvian Chicken
- Make the marinade. Start by combining the garlic, soy sauce, kosher salt, ground cumin, hot paprika, black pepper, oregano, lime juice, red wine vinegar, and avocado oil in a small bowl and whisk until the ingredients are combined. Feel free to blend these ingredients in a blender if you don’t want to press or mince the garlic. I typically hate getting the blender dirty so I just make this in a bowl.
- Let the chicken hang. Then place the chicken in a large bowl or in a gallon-sized bag. Pour the marinade over the chicken, zip the bag, and give it a few good squishes to help the marinade adhere to the chicken. Pop the bag into the refrigerator for at least 3 hours and ideally closer to 24 hours. The longer the chicken marinates, the more flavor it will have. Keep in mind you don’t want ot push it over the24 hour mark. I find that the sweet spot is around 18-20 hours.
- Prepare the chicken. Remove the chicken from the refrigerator at least 30 minutes before grilling or roasting. For this part, you can either grill the chicken on an outdoor grill or pop it on a roasting pan and roast it in the oven. You wouldn’t do both. It’s one or the other.
- Grill the chicken. This works best on a charcoal grill as it gives it more flavor, but a propane grill does work too. Start by preheating the grill and cleaning the grill grates really well. Stuck on food will cause the chicken to stick to clean it up. Oil the grill grates before placing the chicken down. Cook the chicken for 9-12 minutes per side and then test for doneness with a meat thermometer. You want to cook the white meat to 160ºF, and carry-over cooking will get it to165ºF. For dark meat, you want to aim for 170ºF, so that carryover gets it to 175-180ºF. More on that below.
- Roasting the chicken. Preheat the oven to 450ºF. Then line a roasting pan with foil, and place a wire rack on top of the pan. Remove the chicken from the marinade using tongs and line it about 2 inches apart on the pan. Roast for 35-45 minutes then let the chicken rest, loosely tented with a piece of foil. Remove the pieces as they’re done, the darker pieces will take a bit longer.
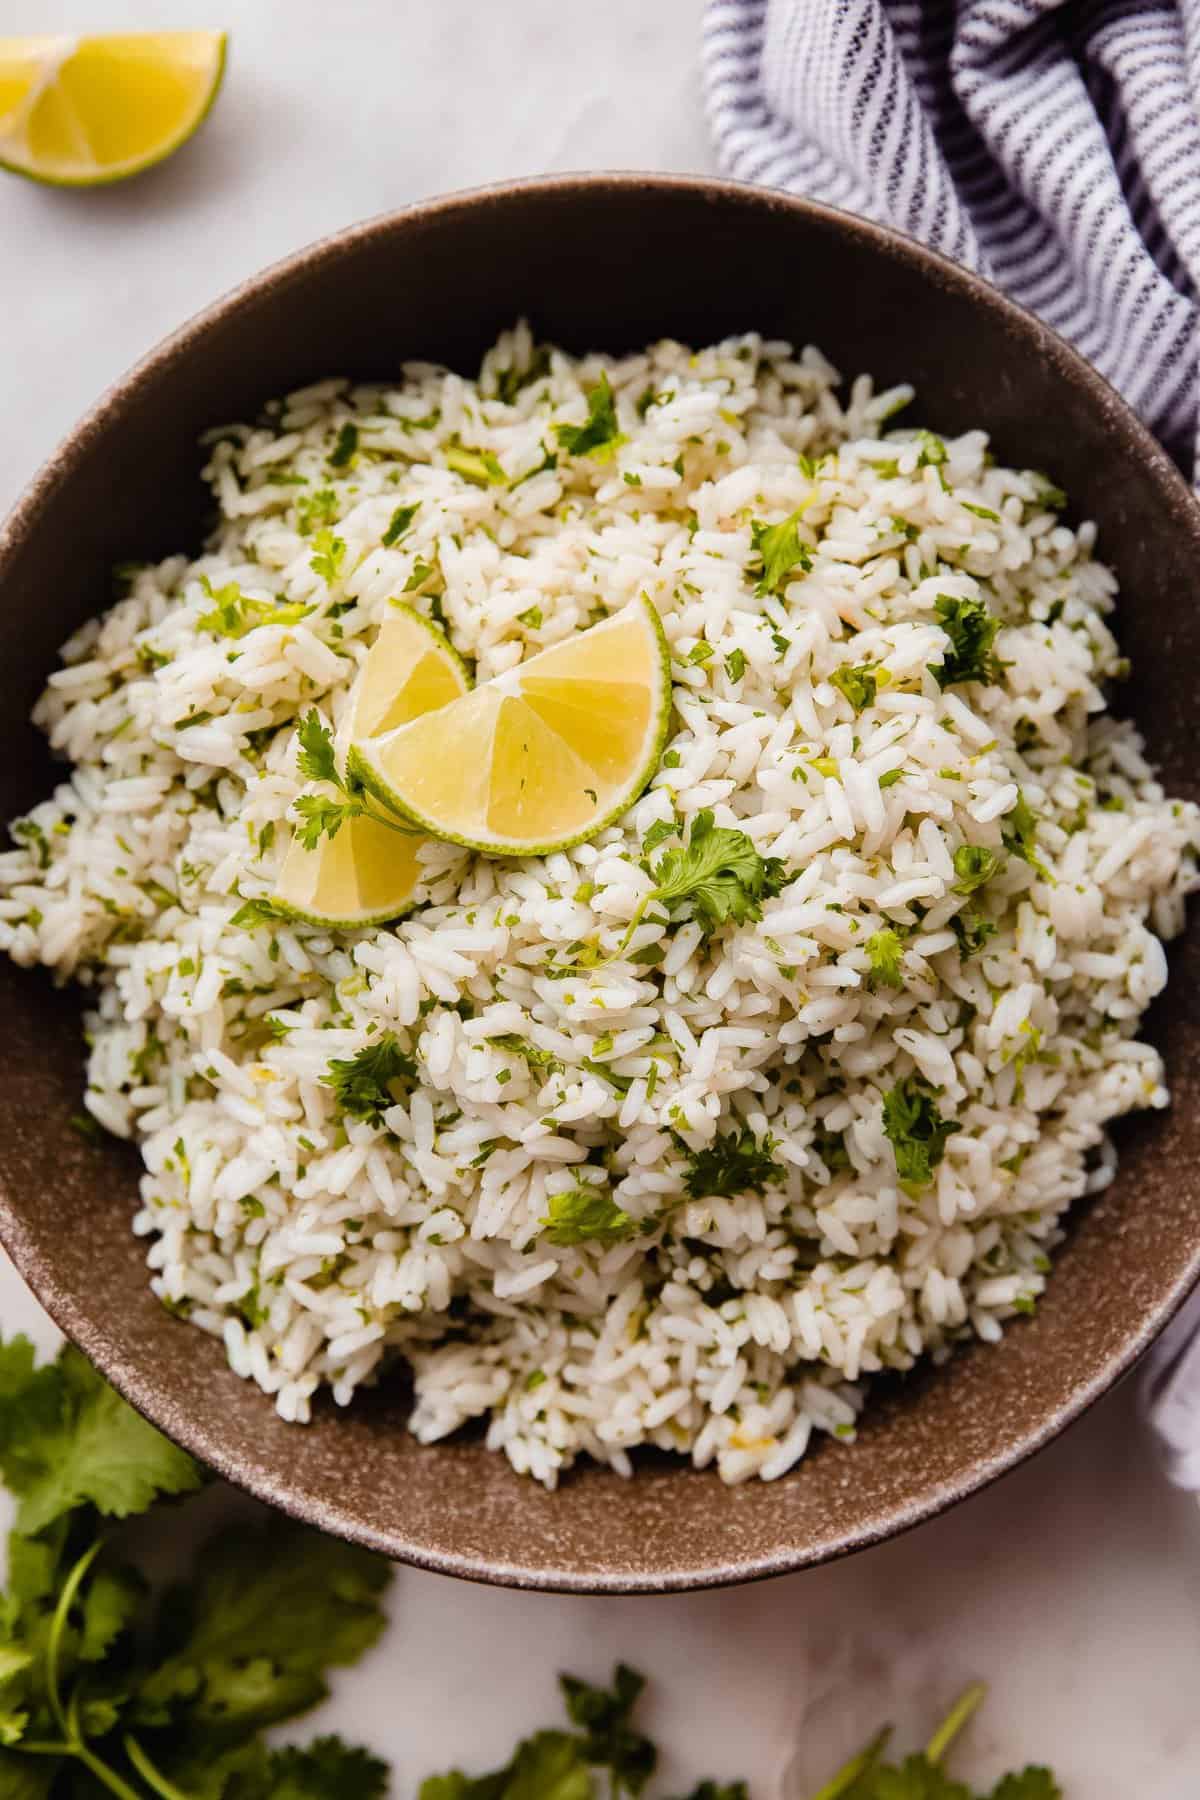
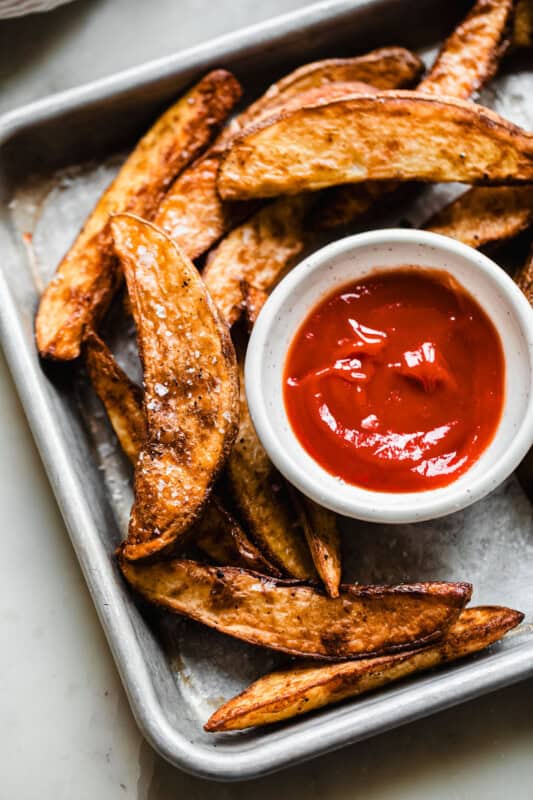
- Serve the chicken. Serve with lime wedges and prepared aji verde drizzled over the chicken with a bed of rice. You can also do french fries, potato wedges, a side salad, or anything else you like.
FAQs about this recipe
Peruvian chicken, or Pollo a La Brasa is an iconic dish from Peru. It’s a whole chicken marinated in lime juice, vinegar, herbs, and spices, then roasted over a woodfire grill or in a rotisserie to create the most delicious smokey chicken. It’s paired with french fries and prepared Aji Verde sauce.
A Peruvian roasted chicken is called Pollo a la Brasa.
Cooking dark meat chicken to 175ºF allows the connective tissue to break down more. Collagen which is naturally found in chicken, is a tough protein, so when it’s cooked to a higher temperature, it breaks down and becomes soft, leaving you with more tender chicken. Cooking it to 175ºF also helps render off more of the fat allowing the chicken skin to become tender and delicious.
It’s great to serve with french fries or potato wedges for dipping, delicious with Lomo Saltado with rice, and wonderful over salads and more.
Place the chicken in an airtight container and store in the refrigerator for up to 3 days. To reheat, simply place the grill in a 300ºF toaster oven or air fryer and heat through for 5-6 minutes or until warmed.
Serving Suggestions
Sauces & Seasonings
Aji Verde (Peruvian Green Sauce)
Rice & Pasta
Better Than Chipotle’s Cilantro Lime Rice
Air Fryer
Air Fryer Potato Wedges
Other grilling recipes to try
- Simple Asian Grilled Chicken
- Easiest Greek Grilled Chicken
- The Most Delicious Carne Asada
- Easiest Grilled Chimichurri Chicken
- Grilled Halloumi Watermelon Salad


Best Peruvian Chicken (Pollo a la Brasa)
Equipment
Ingredients
Peruvian Chicken:
- 3 ½ pound skin-on, bone-in chicken cut into 8 pieces (see notes)
- 8 cloves garlic pressed or minced
- ¼ cup low sodium soy sauce
- 1 tablespoon kosher salt
- 2 teaspoons ground cumin
- 1½ teaspoon hot paprika
- ½ teaspoon black pepper
- ½ teaspoon dried oregano
- 1 tablespoon lime juice
- 1 tablespoon red wine vinegar
- 1 tablespoon avocado oil
To serve:
- Prepared Aji Verde Peruvian Green sauce
- Fluffy rice
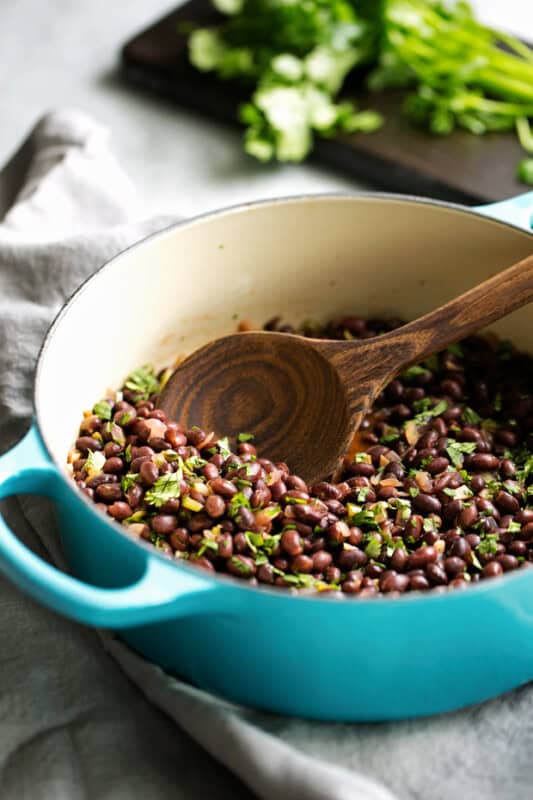
- Prepared Black Beans
Instructions
- MARINADE: Add the garlic, soy sauce, kosher salt, ground cumin, hot paprika, black pepper, oregano, lime juice, red wine vinegar, and avocado oil to a small bowl and whisk until the ingredients are mixed.
- LET IT HANG: Place the chicken pieces in a gallon-sized zip top bag and pour the prepared marinade over the chicken. Zip the bag and give it a few good squishes to help things along. Place chicken in the refrigerator flat on one side for as little as 3 hours, and up to 24 hours in advance. I find the sweet spot to be in the 18-20 hour range. Give the bag a flip throughout the day as you naturally open the refrigerator. I find this way the chicken marinades more evenly on both sides.
COOK: There are two ways to prepare the chicken, you can either grill it or roast it in the oven. You would either grill or roast, not both!
- TO GRILL: Remove the chicken from the refrigerator 30 minutes prior to grilling. Preheat an outdoor grill to 425ºF. When heated, clean the grates, then oil them to prevent chicken from sticking. Place chicken skin side down first. Cook for 9-12 minutes per side or until the chicken breast pieces cook through to 160ºF, and darker pieces cook to 170ºF. Remove chicken to a plate as it’s done. Cover loosely with foil. Carryover cooking will help the chicken cook all the way through. Allow chicken to rest for 5 minutes before serving.
- OR ROAST: Remove chicken from the refrigerator 30 minutes before grilling. Preheat oven to 450ºF. Wrap a baking sheet with foil, then place a rack on top. Remove chicken from marinade with tongs (drip off the excess but don’t wipe down.) Place pieces about 2 inches apart on the rack. Roast for 35-45 minutes or until chicken breasts reach 160ºF and chicken legs/thighs/wings hit 170ºF. Remove, tent with foil, and rest for 5 minutes before serving.
- SERVE: serve chicken with prepared rice, black beans, and Aji Verde.
Notes
- Chicken: You can use all bone-in, skin-on chicken thighs, legs, or even breasts for this recipe. I usually buy a whole chicken that's been cut into 8 pieces (2 wings, 2 breasts, 2 thighs, 2 legs) and use that. But this recipe can be made with a combination of any bone-in, skin-on pieces that you like. Just be sure to use 3-4 pounds of chicken so that there's plenty of marinade to go around.
Nutrition
Nutrition information is automatically calculated, so should only be used as an approximation.
Like This? Leave a comment & rating below!


Is it 1/4 cup soy sauce? Recipe just says 1/4 soy sauce.
This sounds absolutely incredible! The fact that it requires no special equipment is a huge plus, making it accessible for anyone to try.
I made this, including the sauce, for dinner last night. It was absolutely delicious. I woke up thinking about the leftovers for lunch. Thank you for a great recipe.
Hi Ryan! I love that you tried both of these recipes 🙂 So glad to hear you enjoyed them, appreciate you circling back to leave a review!